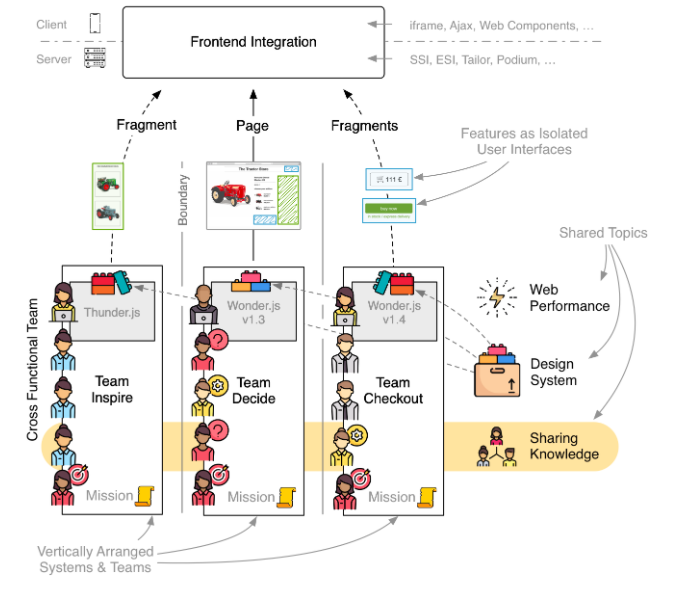
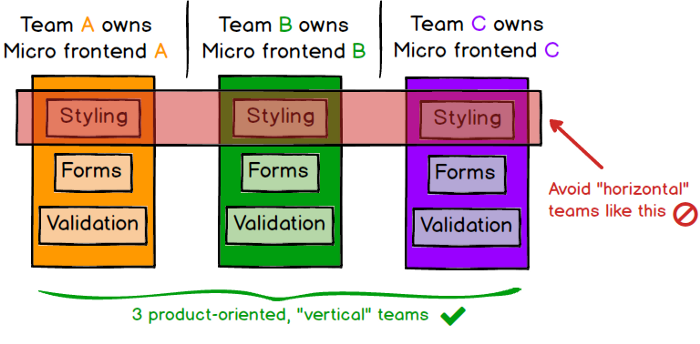
The idea behind Micro Frontends is to think about a website or web app as a composition of features which are owned by independent teams. Each team has a distinct area of business or mission it cares about and specialises in. A team is cross functional and develops its features end-to-end, from database to user interface.
“An architectural style where independently deliverable frontend applications are composed into a greater whole”
In ThoughtsWorks — Technology Radar May 2020 Techniques, MFEs are in “Adopt” stage.
We’ve seen significant benefits from introducing microservices, which have allowed teams to scale the delivery of independently deployed and maintained services. Unfortunately, we’ve also seen many teams create a front-end monolith — a large, entangled browser application that sits on top of the back-end services — largely neutralizing the benefits of microservices. Micro frontends have continued to gain in popularity since they were first introduced.
Pros:
Incremental upgrades
Multiple teams contribute to the frontend
Simple & Decoupled codebases
Development speed should be a constant despite a growing application
External developers should be able to extend the UI
Different teams should be able to use their own tooling (Technology Agnostic)
May be you have done Angular vs React vs VueJS but now we talking about — Angular + React +VueJS — how they can work together.
Cons:
Micro frontends are not perfect for every project. They are a solution for scaling development. If you only have a hand full of developers and communication is no issue the introduction of micro frontends won’t bring much value.
Build micro frontends that coexist and can (but don’t need to) be written with their own framework. This allows you to:
Use multiple frameworks on the same page without refreshing the page (React, AngularJS, Angular, Ember, or whatever you’re using)
Write new code, possibly with a new framework, without rewriting your existing app
Lazy load code for improved initial load time.
Micro frontends are indeed quite popular in the e-commerce sector. In 2012 the Otto Group, a Germany based mail order company and one of the world’s largest e-commerce players started to split up its monolith. The Swedish furniture company IKEA and Zalando, one of Europes biggest fashion retailers, moved to this model. Thalia, a German bookstore chain, rebuilt its e-reader store into vertical slices to increase development speed.
But micro frontends are also used in other industries. Spotify organizes itself in autonomous end-to-end teams they call Squads. Canopy, an American tax software startup and the sports streaming service DAZN use micro frontends to build its applications.
Conclusion:
Microfrontends are sections of your UI, often consisting of dozens of components, that use frameworks like React, Vue, and Angular to render their components. Each microfrontend can be managed by a different team and may be implemented using its own framework. It is practical and suggested to use just one framework for all your microfrontends, although you may add additional frameworks when migrating or when experimenting.
We see it as a proven approach that we should be using when it makes sense to do so.
WebAssembly is a new type of code that can be run in modern web browsers — it is a low-level assembly-like language with a compact binary format that runs with near-native performance and provides languages such as C/C++, C# and Rust with a compilation target so that they can run on the web.
WebAssembly is designed to complement and run alongside JavaScript — using the WebAssembly JavaScript APIs, you can load WebAssembly modules into a JavaScript app and share functionality between the two. This allows you to take advantage of WebAssembly’s performance and power and JavaScript’s expressiveness and flexibility in the same apps, even if you don’t know how to write WebAssembly code.
Now, if you have programs in C/C++ or Rust etc. now you can run those programs on the web with help of WebAssembly alongside JavaScript. You can also develop WebAssembly using AssemblyScript (A language made for WebAssembly).
Now these has opened doors for running complex programs written in “low-level assembly-like language” on web.
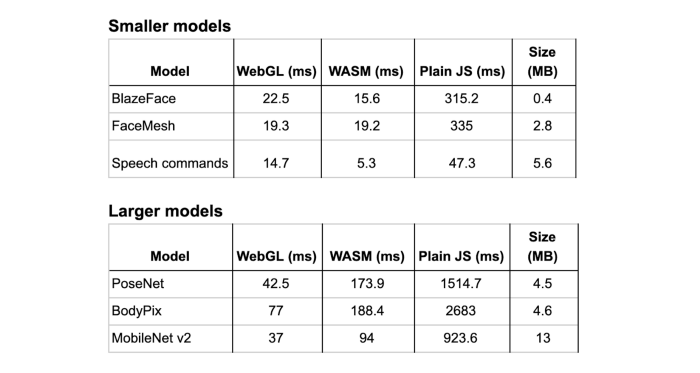
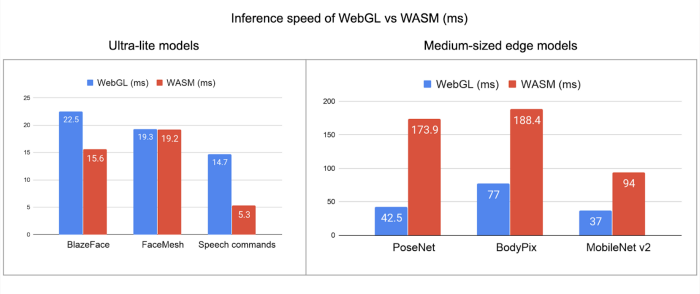
We are already seeing some interesting use cases of WebAssembly, Like TensorFlow has announced — WebAssembly backend for TensorFlow.js (more details here)
TensorFlow WASM backend Performance dataTensorFlow WASM backend Performance data
One more interesting example of WebAssembly could be — A WebAssembly Powered Augmented Reality Sudoku Solver.
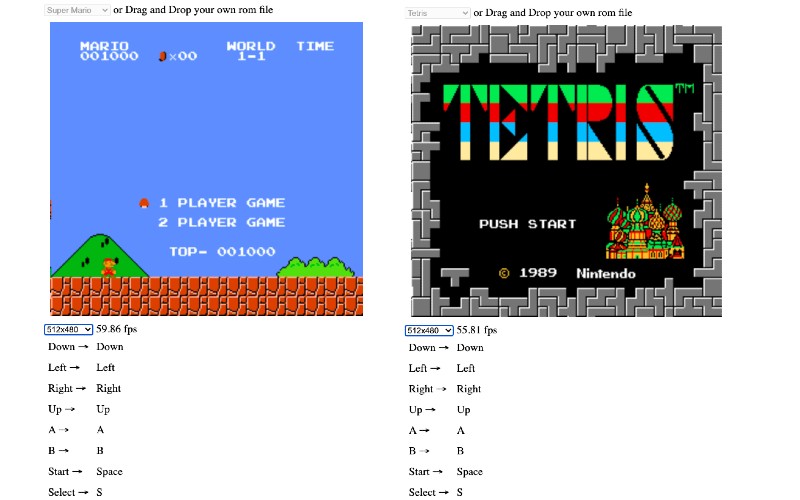
In our example using WebAssembly NES emulator and run Super Mario Brothers and Tetris game in our web browser.
<html>
  <head>
    <meta content="text/html;charset=utf-8" http-equiv="Content-Type"/>
    <style>
    canvas {
      background: #000;
      margin: 10px;
    }
    .actual {
      width: 256;
      height: 240;
    }
    .double {
      width: 512;
      height: 480;
    }
    .quadruple {
      width: 1024;
      height: 960;
    }
    td {
    padding: 5px;
}

    </style>
  </head>
  <body>
    <script type="module">
      import init, { WasmNes, Button } from './nes_rust_wasm.js';

      const setupAudio = (wasm, nes) => {
        const audioContext = AudioContext || webkitAudioContext;

        if (audioContext === undefined) {
          throw new Error('This browser seems not to support AudioContext.');
        }

        const bufferLength = 4096;
        const context = new audioContext({sampleRate: 44100});
        const scriptProcessor = context.createScriptProcessor(bufferLength, 0, 1);

        scriptProcessor.onaudioprocess = e => {
          const data = e.outputBuffer.getChannelData(0);
          nes.update_sample_buffer(data);
          // Adjust volume
          for (let i = 0; i < data.length; i++) {
            data[i] *= 0.25;
          }
        };

        scriptProcessor.connect(context.destination);
      };

      const start = romArrayBuffer => {
        // @TODO: Call init beforehand
        init()
          .then(wasm => run(wasm, new Uint8Array(romArrayBuffer)))
          .catch(error => console.error(error));
      };

      const run = (wasm, romContentArray) => {
        const width = 256;
        const height = 240;
        const canvas = document.getElementById('nesCanvas');
        const ctx = canvas.getContext('2d');
        const imageData = ctx.createImageData(width, height);
        const pixels = new Uint8Array(imageData.data.buffer);
        const nes = WasmNes.new();
        nes.set_rom(romContentArray);
        setupAudio(wasm, nes);
        nes.bootup();

        // FPS counter

        let totalElapsedTime = 0.0;
        let previousTime = performance.now();
        let frameCount = 0;
        const fpsSpan = document.getElementById('fpsSpan');

        const countFps = () => {
          frameCount++;
          const currentTime = performance.now();
          const elapsedTime = currentTime - previousTime;
          totalElapsedTime += elapsedTime;
          previousTime = currentTime;
          if ((frameCount % 60) === 0) {
            fpsSpan.textContent = (1000.0 / (totalElapsedTime / 60)).toFixed(2);
            totalElapsedTime = 0.0;
            frameCount = 0;
          }
        }

        // animation frame loop

        const stepFrame = () => {
          requestAnimationFrame(stepFrame);
          countFps();
          nes.step_frame();
          nes.update_pixels(pixels);
          ctx.putImageData(imageData, 0, 0);
        };

        // joypad event listener setup

        // @TODO: Mapping should be configurable
        const getButton = keyCode => {
          switch (keyCode) {
            case 32: // space
              return Button.Start;
            case 37: // Left
              return Button.Joypad1Left;
            case 38: // Up
              return Button.Joypad1Up;
            case 39: // Right
              return Button.Joypad1Right;
            case 40: // Down
              return Button.Joypad1Down;
            case 50: // 2
              return Button.Joypad2Down;
            case 52: // 4
              return Button.Joypad2Left;
            case 54: // 6
              return Button.Joypad2Right;
            case 56: // 8
              return Button.Joypad2Up;
            case 65: // A
              return Button.Joypad1A;
            case 66: // B
              return Button.Joypad1B;
            case 82: // R
              return Button.Reset;
            case 83: // S
              return Button.Select;
            case 88: // X
              return Button.Joypad2A;
            case 90: // Z
              return Button.Joypad2B;
            default:
              return null;
          }
        };

        window.addEventListener('keydown', event => {
          const button = getButton(event.keyCode);
          if (button === null) {
            return;
          }
          nes.press_button(button);
          event.preventDefault();
        }, false);

        window.addEventListener('keyup', event => {
          const button = getButton(event.keyCode);
          if (button === null) {
            return;
          }
          nes.release_button(button);
          event.preventDefault();
        }, false);

        stepFrame();
      };

      // rom load

      let romSelected = false;

      document.getElementById('romSelect').addEventListener('change', event => {
        if (romSelected) return;
        romSelected = true;
        const select = event.target;
        const option = select.selectedOptions[0];
        const filename = option.value;
        if (!filename) {
          return;
        }
        select.disabled = true; // @TODO: Reset Nes instead
        fetch('./' + filename)
          .then(result => result.arrayBuffer())
          .then(start)
          .catch(error => console.error(error));
      });

      window.addEventListener('dragover', event => {
        event.preventDefault();
      }, false);

      window.addEventListener('drop', event => {
        event.preventDefault();
        if (romSelected) return;
        romSelected = true;
        document.getElementById('romSelect').disabled = true; // @TODO: Reset Nes instead
        const reader = new FileReader();
        reader.onload = e => {
          start(e.target.result);
        };
        reader.onerror = e => {
          console.error(e);
        };
        reader.readAsArrayBuffer(event.dataTransfer.files[0]);
      }, false);

      // screen size

      document.getElementById('screenSizeSelect').addEventListener('change', event => {
        const select = event.target;
        const option = select.selectedOptions[0];
        const className = option.value;
        if (!className) {
          return;
        }
        const canvas = document.getElementById('nesCanvas');
        for (const name of ['actual', 'double', 'quadruple']) {
          if (name === className) {
            canvas.classList.add(name);
          } else {
            canvas.classList.remove(name);
          }
        }
      });
    </script>

    <div>
      <select id="romSelect">
        <option value="" selected>-- select rom --</option>
        <option value="Super_mario_brothers.nes">Super Mario</option>
        <option value="Tetris.nes">Tetris</option>
      </select>
      or Drag and Drop your own rom file
    </div>
    <div>
      <canvas id="nesCanvas" width="256" height="240"></canvas>
    </div>
    <div>
      <select id="screenSizeSelect">
        <option value="actual" selected>256x240</optioin>
        <option value="double">512x480</optioin>
        <option value="quadruple">1024x960</optioin>
      </select>
      <span id="fpsSpan">--.--</span> fps
    </div>
    <div>
      <table>
        <tr>
          <td>Down →</td>
          <td>Down</td>
        </tr>
        <tr>
          <td>Left →</td>
          <td>Left</td>
        </tr>
        <tr>
          <td>Right →</td>
          <td>Right</td>
          <!-- <td>6</td> -->
        </tr>
        <tr>
          <td>Up →</td>
          <td>Up</td>
          <!-- <td>8</td> -->
        </tr>
        <tr>
          <td>A →</td>
          <td>A</td>
          <!-- <td>X</td> -->
        </tr>
        <tr>
          <td>B →</td>
          <td>B</td>
          <!-- <td>Z</td> -->
        </tr>
        <tr>
          <td>Start →</td>
          <td>Space</td>
          <!-- <td>-</td> -->
        </tr>
        <tr>
          <td>Select →</td>
          <td>S</td>
          <!-- <td>-</td> -->
        </tr>
        <tr>
          <td>Reset →</td>
          <td>R</td>
          <!-- <td>-</td> -->
        </tr>
      </table>
    </div>
    <div>
      <p>NES Roms Copyright
      <a href="https://github.com/takahirox/nes-rust">NES emulator in Rust</a></p>
    </div>
  </body>
</html>
4. Open our “rust_wasm_demo.html” in browser.
Press “Space” to Start, Press “R” to Reset
Conclusion:
WebAssembly brings the performance of native applications to the web in a way that’s completely secure, yet enabling a full functionality expected from games, major applications and the entire spectrum of software you can run on a computer. WebAssembly is just built as a binary format and very compact to download, and also very efficient to compile and execute. There’s a whole bunch of optimizations coming that will drive that even further, allowing huge mobile applications to load up quickly, even on mobile devices.